Roleplay Action Scene Choreography You Can Follow
Rin has a shawl, an empty picnic basket and an escaped wind-up moon to catch. The moon is rolling around the hub of a carousel bridge. Rin is still on the west landing. Before either moves, the scene needs a path between them. Name the few places that matter, establish their connections, and separate an attempted move from its accepted result. Then action can stay lively without leaving the reader to guess who crossed which gap.
Updated by the tempteo editorial team
The writing examples below are invented. They illustrate the advice and are not recorded chat results.
On this page
Draw four labels before writing the chase
The original scene is SFW, non-graphic fantasy with a grown-up cast. Its impossible carousel and toy moon are invented illustrations, not product-test replies or real stunt advice.
Copyable scene note
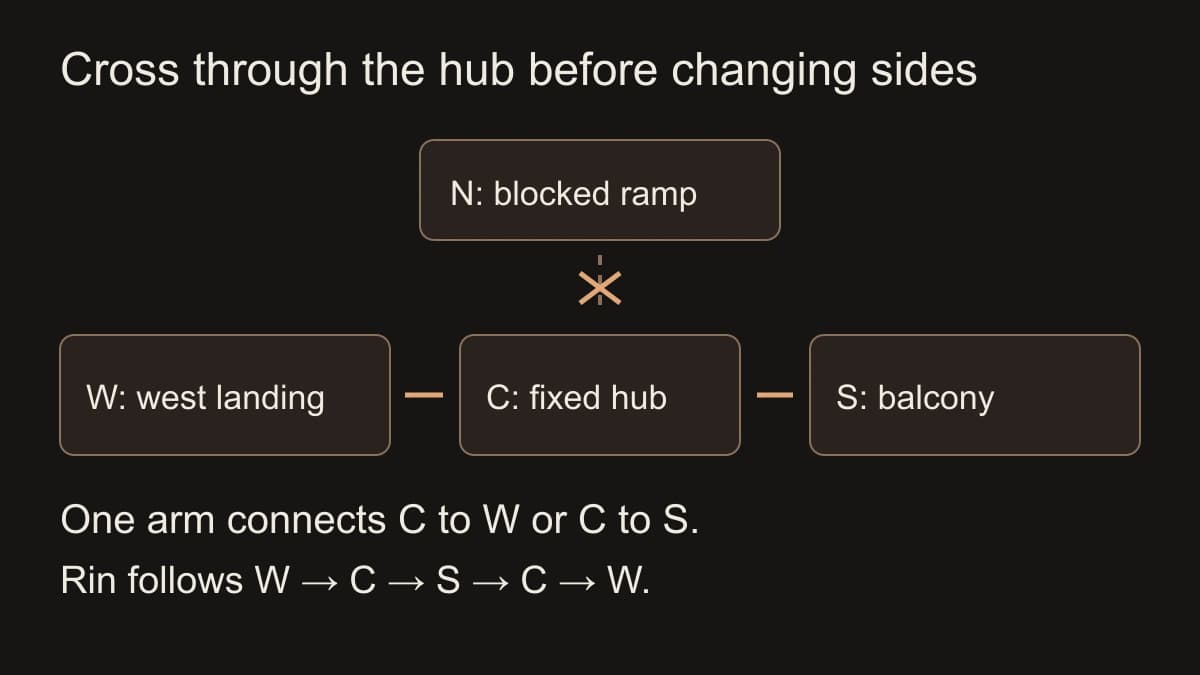
W: West Landing. Rin starts here with shawl and empty basket. C: Center Hub. Steward Toma and wind-up moon start here. S: South Balcony. Fixed low buffer around its outer edge. N: North Ramp. Blocked by a fallen giant paper crown. A: One rotating arm, attached to C, long enough to connect C to W or S. Initial connection: W <-> A <-> C. After Toma rings the carousel bell: C <-> A <-> S; W disconnected. North obstruction: C-to-N passage stays blocked by crown in either alignment. No direct W-to-S path. Nobody crosses an unconnected gap. The bell moves the arm between W and S only; it does not move characters off C.
These are story labels you could sketch, not a product grid. The hub stays fixed while the arm rotates. The moon can roll across C and along a connected arm. A trip from W to S therefore requires reaching C first, changing the arm's alignment, then crossing from C to S.
The Writing Excuses episode on blocking gives fiction-writing background for establishing terrain before using it and making relative movement comprehensible. This floor plan and scene are original.
Log attempts only as far as the response supports
Copyable scene note
Beat: Accepted positions before: Arm/path connection now: Reader's attempted action: Obstacle or opposing movement: AI-portrayed response and immediate outcome: Accepted positions after: Objects/resources changed: Next action left to reader:
Write "Rin at C, moon at S, arm aligned S" beside the chat. If a later reply places Rin back at W, that record identifies the position to correct.
You play Rin. The AI portrays Toma, the wind-up moon and the surroundings. Toma can ring the fantasy bell and offer his single star crumb. The moon wants to keep rolling; it will not automatically sit in a basket. You choose Rin's attempts, dialogue and reactions. Keep the position notes yourself and send a relevant scene or OOC update when needed.
For writing the rest of a turn, the roleplay reply guide covers reactions and hooks. Here, the extra work is preserving the path and the last accepted position across a moving scene.
Follow one continuous crossing
This includes the map and control boundary, with no capture solution.
OOC scene message
OOC: I play Rin; portray Toma, an escaped wind-up moon and the carousel bridge. Leave Rin's words, actions and feelings to me. Rin starts at W, West Landing, with a shawl and empty basket. Toma and the moon are at C, fixed Center Hub. One arm A currently connects W to C. Toma's bell can rotate it to connect C to S, South Balcony, disconnecting W. The bell never moves anyone off C. N, North Ramp, is blocked by a giant paper crown. There is no direct W-to-S path. S has a low outer buffer. Toma has one star crumb. The moon wants to keep rolling. Start with the moon at C and stop before Rin's first attempted move.
Illustrative AI reply
The moon makes a bright wooden clatter around C. Toma watches it rather than ringing the bell. "West arm is steady. If you want the south balcony, come to the hub first." The paper crown fills the North Ramp like an enormous tipped teacup.
Your turn as Rin
Rin attempts to cross from W along the west-aligned arm to C, carrying the basket and keeping the shawl folded. "Leave the bell alone until I'm on the hub."
Illustrative AI reply
Rin reaches C along the connected arm. Toma keeps the bell quiet. The moon rolls toward the North Ramp, bumps the paper crown and curves back across C. It remains on the hub, beyond the reach of a folded shawl.
Your turn as Rin
Rin opens the shawl and attempts to spread it across the moon's next path on C, without grabbing Toma or changing the arm.
Illustrative AI reply
The moon spins on one point and skirts the shawl's edge. It stays at C, still free. Toma holds out a star crumb from his pocket. "It likes these. The south buffer would give it less room to circle, if you want to lead it there."
The shawl attempt misses, leaving the moon free at C. Toma's crumb gives Rin another possible approach; the reader still chooses whether to use it.
Your turn as Rin
Rin takes the offered crumb and gathers the shawl. "Ring for south. I'll stay on C while the arm turns."
Illustrative AI reply
Toma rings the bell. The arm rotates from W to S while Rin, Toma and the moon remain on C. The West Landing is now disconnected; a continuous path runs from C along the arm to the South Balcony. The North Ramp stays blocked.
Your turn as Rin
Rin places the crumb at the beginning of the south-aligned arm and attempts to draw the moon toward S, keeping the basket on C.
Illustrative AI reply
The moon follows the crumb onto the arm, eats it in a shower of tiny star-shaped sparks, and keeps rolling along that connected path. It reaches S and taps the low outer buffer. Rin and the basket remain at C; Toma stands beside the bell there. The moon is still free on S.
Your turn as Rin
Rin attempts to cross from C along the same arm to S with basket and shawl. "Toma, keep this alignment."
Illustrative AI reply
Toma leaves the bell alone. Rin reaches S by the connected arm. The moon rolls along the balcony buffer, then turns toward the arm's entrance. Rin is now on the same balcony, holding the basket and shawl. The moon is headed for the arm's entrance; Rin has not blocked it yet.
Your turn as Rin
Rin sets the basket on S and attempts to lay the shawl across the moon's route, making a soft funnel toward the basket mouth.
Illustrative AI reply
The moon bumps the shawl, changes direction along its edge and rolls into the open basket. It rattles there, not yet covered. The arm still connects S to C, and Toma remains at C.
Your turn as Rin
Rin places the shawl over the basket mouth and picks it up. "Got our moon. I'll carry it back to the hub." Rin attempts the return along the south arm.
Illustrative AI reply
The moon stays beneath the shawl, rattling inside the basket. Rin reaches C along the connected arm; Toma lifts a finger toward the bell. "West again?" he asks beside the bell.
Your turn as Rin
"Yes. Rin waits on C for west alignment, then attempts to walk back to W with the covered basket."
Illustrative AI reply
Toma rings the bell, rotating the arm from S to W while Rin waits at C. Rin then reaches W along the newly connected west arm. The covered moon is back on the West Landing. Toma remains at C; the crown still blocks N. The star crumb is spent.
Rin returns by C-to-W after the arm turns west. Keep the earlier missed shawl attempt and spent crumb in the final record.
Read the filled movement log
These labeled records condense the significant changes; the companion worksheet retains the complete records and blank form.
Entry: Rin W, Toma C, moon C, arm W. Attempt W-to-C. Accepted arrival at C; moon's northward roll rebounds from the existing crown and stays C.
First catch: Everyone C, arm W. Shawl attempt misses when moon spins away. Positions stay C; no capture accepted.
Alignment: Rin takes offered crumb, stays C and requests bell. Arm changes W-to-S; everyone stays C. W disconnected, N still blocked.
Lure: Rin C with basket; moon C. Crumb draws moon along arm to S; crumb consumed. Rin stays C, moon free at S.
Pursuit: Rin attempts C-to-S along arm. Arrival accepted; Toma C, moon S, basket/shawl with Rin S.
Capture and cover: Rin places basket and shawl on S. Moon rolls along shawl into basket, still uncovered. Rin then covers and picks it up; covered capture is accepted in next response.
Return: Rin reaches C along south arm with basket. Reader requests west alignment while waiting at C. Toma rings; arm becomes W; Rin reaches W carrying covered moon. N remains blocked throughout.
The log describes an accepted sequence, not instructions that the AI executes for you. Don't update a position merely because an attempt was written.
Correct an impossible crossing without resetting the map
Suppose the accepted state is the lure beat: Rin and Toma at C, moon at S, arm aligned south, crumb consumed. The next reply goes wrong.
Wrong continuation: "Rin vaults through the blocked North Ramp, lands beside the moon on S and grabs it, delighted."
There is no N-to-S connection. It also gives Rin an unchosen move, successful grab and feeling.
OOC correction
OOC: Keep the accepted state: Rin and Toma at C, moon free at S, arm connecting C to S, W disconnected, N blocked, crumb consumed. Ignore Rin's northward vault, arrival, grab and feeling. There is no N-to-S path. Continue from these positions with the south arm available, and stop before Rin chooses a crossing or capture attempt.
Corrected illustration: "The moon taps S's outer buffer and turns back toward the arm. From C, Rin can see the connected south path. Toma keeps the bell quiet. The paper crown still blocks N."
That correction doesn't put the moon back on C or return the spent crumb. It removes only the unsupported crossing and control grab. The earlier wrong reply remains in chat history; the OOC message specifies where to resume. The player-control guide has broader fixes for unchosen actions and feelings.
Sketch the places in your own next scene, label the open connection, then send one attempted move in roleplay AI chat.
Copy a starter or worksheet
Choose one starter or form to copy. Keep the planning record in your own notes and check the next chat reply against it.
blank action starter
OOC: I play [character]; portray [other characters/setting]. Leave my character's words, actions and feelings to me. Named positions and starting occupants: [labels]. Connections currently open: [paths]. Blocked paths and reasons: [obstructions]. How a connection can change: [fictional cause and limits]. Objects held/available: [where and by whom]. Other party's goal: [goal]. Start at [accepted state]. Describe the immediate situation without choosing my first move.
blank floor plan and log
Floor-plan labels, repeat per place: Label and name: Starting occupants: Objects/features: Connectivity record, repeat per path: Endpoints: Open or blocked now: Requirement for crossing: Cause that can change connection: What connection changes do not move: Control boundary: Reader-controlled character: AI-portrayed characters/environment: Reader attempts versus accepted results: Action record, repeat per beat: Beat: Accepted positions before: Arm/path connection now: Reader's attempted action: Obstacle or opposing movement: AI-portrayed response and immediate outcome: Accepted positions after: Objects/resources changed: Next action left to reader: Final state: Positions: Open and blocked connections: Goal result: Remaining/spent objects: Repair record: Last accepted positions/connections: Unsupported movement/control to ignore: Accepted resources/results to preserve: Next reader choice:
filled action starter
OOC: I play Rin; portray Toma, an escaped wind-up moon and the carousel bridge. Leave Rin's words, actions and feelings to me. Rin starts at W, West Landing, with a shawl and empty basket. Toma and the moon are at C, fixed Center Hub. One arm A currently connects W to C. Toma's bell can rotate it to connect C to S, South Balcony, disconnecting W. The bell never moves anyone off C. N, North Ramp, is blocked by a giant paper crown. There is no direct W-to-S path. S has a low outer buffer. Toma has one star crumb. The moon wants to keep rolling. Start with the moon at C and stop before Rin's first attempted move.
filled floor plan and complete log
Floor-plan W: Label and name: W, West Landing. Starting occupants: Rin. Objects/features: Shawl and empty basket carried by Rin. Floor-plan C: Label and name: C, fixed Center Hub. Starting occupants: Toma and wind-up moon. Objects/features: Carousel bell, one star crumb held by Toma, north access blocked by crown. Floor-plan S: Label and name: S, South Balcony. Starting occupants: None. Objects/features: Low outer buffer. Floor-plan N: Label and name: N, North Ramp. Starting occupants: None. Objects/features: Fallen giant paper crown blocking C-to-N passage. Floor-plan A: Label and name: A, single rotating arm attached to C. Starting occupants: None. Objects/features: Reaches W or S, no independent destination. Connectivity W-A-C: Endpoints: West Landing to Center Hub via arm. Open or blocked now: Open initially; disconnected when arm points S. Requirement for crossing: Arm aligned W. Cause that can change connection: Toma rings fantasy bell, changing alignment between W and S. What connection changes do not move: Anyone standing on C remains there. Connectivity C-A-S: Endpoints: Center Hub to South Balcony via arm. Open or blocked now: Disconnected initially; open when arm points S. Requirement for crossing: Arm aligned S. Cause that can change connection: Same bell; no independent second arm. What connection changes do not move: Characters on C remain C; characters on S remain S. Connectivity C-N: Endpoints: Center Hub to North Ramp. Open or blocked now: Blocked throughout by crown. Requirement for crossing: Obstruction would need an accepted change, which this scene does not supply. Cause that can change connection: None used here; bell does not remove crown. What connection changes do not move: Bell cannot produce N-to-S route. No direct W-to-S path exists. Control boundary: Reader-controlled character: Rin, including attempts, words and feelings. AI-portrayed characters/environment: Toma, rolling moon and carousel surroundings. Reader attempts versus accepted results: An attempt does not update position/capture until supported response is accepted. Moon wants continued motion; Toma offers crumb and controls bell without choosing Rin's action. Full action log Beat: 1, arrival. Accepted positions before: Rin W; Toma C; moon C. Arm/path connection now: W-A-C open; S disconnected; N blocked. Reader's attempted action: Cross W-to-C with basket and folded shawl; request bell quiet. Obstacle or opposing movement: Moon rolls toward blocked N. AI-portrayed response and immediate outcome: Rin arrives C; Toma leaves bell quiet; moon bumps crown and curves back on C. Accepted positions after: Rin C; Toma C; moon C. Objects/resources changed: None. Next action left to reader: Choose catch attempt or another supported move. Beat: 2, missed shawl. Accepted positions before: All at C. Arm/path connection now: W aligned, N blocked. Reader's attempted action: Open shawl across moon's path without moving arm or grabbing Toma. Obstacle or opposing movement: Moon spins around shawl edge. AI-portrayed response and immediate outcome: Attempt misses; Toma offers his crumb and suggests S buffer. Accepted positions after: All at C, moon free. Objects/resources changed: Shawl open; crumb still offered by Toma. Next action left to reader: Accept crumb/proposal or choose otherwise. Beat: 3, turn south. Accepted positions before: All C. Arm/path connection now: W aligned before bell. Reader's attempted action: Take offered crumb, gather shawl, request south alignment while staying C. Obstacle or opposing movement: W will disconnect. AI-portrayed response and immediate outcome: Toma rings; arm rotates to S; nobody leaves C. Accepted positions after: All C. Objects/resources changed: Crumb held by Rin; W disconnected, south path open. Next action left to reader: Use south connection or another action from C. Beat: 4, lure. Accepted positions before: Rin C with basket/shawl/crumb; Toma C; moon C. Arm/path connection now: C-A-S open; W disconnected; N blocked. Reader's attempted action: Place crumb at arm entrance to draw moon south; keep basket C. Obstacle or opposing movement: Moon remains mobile and uncaptured. AI-portrayed response and immediate outcome: Moon follows arm, consumes crumb and reaches S, tapping buffer. Accepted positions after: Rin C; Toma C; moon S free; basket C. Objects/resources changed: Crumb consumed. Next action left to reader: Choose crossing/capture plan. Repair example starts here. Beat: 5, pursuit. Accepted positions before: Rin C, Toma C, moon S. Arm/path connection now: South open, others unchanged. Reader's attempted action: Cross C-to-S carrying basket and shawl; ask Toma to hold alignment. Obstacle or opposing movement: Moon turns from buffer toward arm entrance. AI-portrayed response and immediate outcome: Toma leaves bell quiet; Rin reaches S via arm. Accepted positions after: Rin S; moon S free; Toma C. Objects/resources changed: Basket/shawl now with Rin S. Next action left to reader: Interception attempt. Beat: 6, basket entry. Accepted positions before: Rin S; moon S; Toma C. Arm/path connection now: South still open. Reader's attempted action: Put basket on S and shawl across moon's route as soft funnel. Obstacle or opposing movement: Moon bumps shawl and changes course. AI-portrayed response and immediate outcome: Moon rolls along shawl into basket; still uncovered. Accepted positions after: Rin S; moon inside open basket S; Toma C. Objects/resources changed: Basket contains moon but capture not covered. Next action left to reader: Cover, release or another choice. Beat: 7, cover and return to hub. Accepted positions before: Rin S, moon in open basket S, Toma C. Arm/path connection now: C-A-S open. Reader's attempted action: Cover basket with shawl, pick up, attempt S-to-C return. Obstacle or opposing movement: Moon rattles beneath shawl, does not leave accepted container. AI-portrayed response and immediate outcome: Covered moon remains inside; Rin arrives C via south arm; Toma asks about west. Accepted positions after: Rin C holding covered moon; Toma C. Objects/resources changed: Shawl now cover; basket held by Rin. Next action left to reader: Request alignment or stay C. Beat: 8, return west. Accepted positions before: Rin C with basket; Toma C; covered moon carried C. Arm/path connection now: S aligned before bell. Reader's attempted action: Request west, wait C, then attempt C-to-W when aligned. Obstacle or opposing movement: South path disconnects on bell. AI-portrayed response and immediate outcome: Toma rings, arm points W, Rin walks connected path to W. Accepted positions after: Rin W with moon; Toma C. Objects/resources changed: Star crumb still spent; crown still blocks N. Next action left to reader: Later scene optional. Final state: Positions: Rin and basket containing covered moon W; Toma C. Open and blocked connections: W-A-C open; S disconnected; C-N blocked. Goal result: Escaped wind-up moon returned covered to West Landing. Remaining/spent objects: Basket and shawl retained; crumb spent; paper crown unchanged. Repair record, at beat 4: Last accepted positions/connections: Rin C, Toma C, moon free S, arm S, W disconnected, N blocked. Unsupported movement/control to ignore: Rin vaulting through N to S, automatic grab and delight. Accepted resources/results to preserve: Moon's completed lure to S and consumed crumb; do not reset them. Next reader choice: Crossing south arm or another coherent move from C; capture undecided.
focused repair message
OOC: Keep the accepted state: Rin and Toma at C, moon free at S, arm connecting C to S, W disconnected, N blocked, crumb consumed. Ignore Rin's northward vault, arrival, grab and feeling. There is no N-to-S path. Continue from these positions with the south arm available, and stop before Rin chooses a crossing or capture attempt. This requests a continuation at the valid positions; it leaves earlier chat text in history.

